
Juniper Networks WLA532-WW
Pandhuan Pangguna Titik Akses Nirkabel Juniper WLA532
Model: WLA532-WW | Brand: Juniper Networks
1. Pambuka
The Juniper Networks WLA532 Wireless Access Point is designed to provide a high level of integration for security, performance, and manageability, ensuring an optimal WLAN user experience with enhanced reliability. This device features an energy-efficient power design, robust security protocols, dual radios, 3x3 MIMO technology, 3 spatial streams, and a 1 Gigabit Ethernet uplink port. Its compact footprint allows for efficient deployment. The WLA532 helps reduce Capital Expenditure (CAPEX) by requiring fewer access points per floor and lowers Operational Costs (OPEX) through reduced IT staffing demands, thanks to improved reliability with concurrent spectrum analysis and deployments optimized for known interference sources.
2. Isi Paket
Please verify that all items are present in your package. If any items are missing or damaged, contact your vendor or Juniper Networks support immediately.
- Juniper WLA532 Wireless Access Point
- Mounting Bracket (for ceiling or wall mount)
- Pemasangan Hardware (sekrup, jangkar)
- Pandhuan / Dokumentasi Cepet
- (Optional, depending on SKU) Power Adapter or PoE Injector
3. Informasi Safety
Read all safety warnings and instructions before installing or operating this device. Keep this manual for future reference.
- Sumber Daya: Use only the power adapter or Power over Ethernet (PoE) source specified for this device. Incorrect voltage may cause damage or fire.
- Ventilasi: Ensure proper ventilation. Do not block any ventilation openings. Overheating can cause damage.
- Lingkungan: Do not expose the device to water, moisture, or extreme temperatures. Avoid placing it near heat sources or in direct sunlight.
- Layanan: Aja nyoba mbukak utawa ndandani piranti dhewe. Waca kabeh layanan kanggo personel qualified.
- Pemasangan: Ensure the device is securely mounted to a stable surface to prevent it from falling.
4. Persiyapan lan Instalasi
This section guides you through the physical installation and initial power-up of your Juniper WLA532 Access Point.
4.1. Swara Fisikview
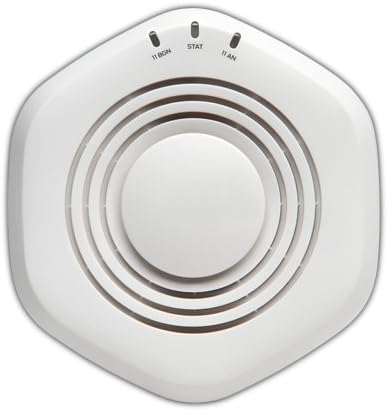
Gambar 1: Ndhuwur view of the Juniper WLA532 Wireless Access Point. Note the indicator lights for 11 BGN, STAT, and 11 AN.
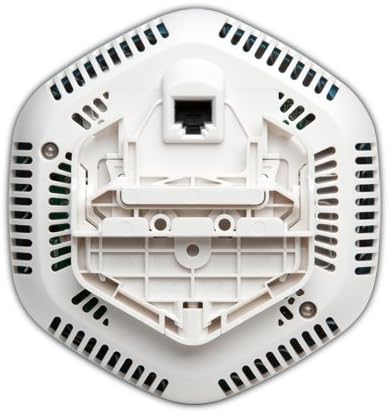
Gambar 2: Ngisor view of the Juniper WLA532 Wireless Access Point, illustrating the integrated mounting bracket and the Gigabit Ethernet port for network connectivity and Power over Ethernet (PoE).
4.2. Pasang Titik Akses
The WLA532 can be mounted on a ceiling or wall. Choose a central location free from obstructions for optimal wireless coverage.
- Siapke lumahing Mounting: Use the mounting bracket as a template to mark the drill holes on the ceiling or wall.
- Pasang Jangkar: Drill pilot holes and insert appropriate wall anchors if mounting on drywall or plaster.
- Ngamanake Bracket: Pasang braket pemasangan menyang permukaan nggunakake sekrup sing wis disedhiyakake.
- Pasang Titik Akses: Align the access point with the mounting bracket and twist it clockwise until it clicks securely into place.
4.3. Nyambung menyang Jaringan lan Daya
The WLA532 supports Power over Ethernet (PoE) for simplified installation.
- Sambungan Ethernet: Connect a standard Ethernet cable from your network switch (preferably a PoE-enabled switch) to the Gigabit Ethernet port on the bottom of the WLA532.
- Power (PoE): If using a PoE-enabled switch, the device will power on automatically once the Ethernet cable is connected.
- Power (Optional AC Adapter): If PoE is not available, connect a compatible Juniper Networks AC power adapter (sold separately) to the power input port on the device and then to a power outlet.
- Verifikasi Daya: Once powered, the indicator lights on the top of the device (Figure 1) should illuminate, indicating power and network activity. Refer to the "Indicator Lights" section for details.
4.4. Konfigurasi wiwitan
Initial configuration typically involves accessing the device's web-based management interface or using Juniper's network management software. Refer to the separate Juniper Networks WLA532 Software Configuration Guide for detailed instructions on setting up SSIDs, security, and other network parameters.
5. Operasi Titik Akses
Once installed and configured, the Juniper WLA532 operates as a wireless access point, broadcasting Wi-Fi signals for client devices to connect to your network.
5.1. Lampu Indikator
| cahya | Status | Katrangan |
|---|---|---|
| 11 BGN | Ijo Solid | 802.11b/g/n (2.4 GHz) radio is operational. |
| Blinking Green | Activity on the 2.4 GHz radio. | |
| STAT | Ijo Solid | Piranti urip lan operasi normal. |
| Blinking Green | Firmware upgrade in progress or other system activity. | |
| 11 AN | Ijo Solid | 802.11a/n (5 GHz) radio is operational. |
| Blinking Green | Activity on the 5 GHz radio. |
5.2. Connecting Client Devices
Client devices (laptops, smartphones, tablets) can connect to the WLA532 using the configured Wi-Fi network (SSID) and password. Ensure your devices support 802.11n for optimal performance.
6. Pangopènan
Regular maintenance helps ensure the longevity and optimal performance of your access point.
- Reresik: Gently wipe the exterior of the device with a soft, dry cloth. Do not use liquid cleaners or aerosols. Ensure ventilation openings are free from dust accumulation.
- Nganyari Firmware: Priksa dhukungan Juniper Networks kanthi periodik website for the latest firmware updates. Keeping the firmware updated ensures the best performance, security, and access to new features. Follow the instructions provided with the firmware update package carefully.
- Kondisi Lingkungan: Ensure the operating environment remains within the recommended temperature and humidity ranges to prevent damage.
7. Ngatasi masalah
This section provides solutions to common issues you might encounter with your Juniper WLA532 Access Point.
7.1. No Power / Lights Off
- Priksa Sumber Daya: Ensure the Ethernet cable is securely connected to a PoE-enabled switch or a compatible AC power adapter is properly connected to a working power outlet.
- Verifikasi PoE: If using PoE, confirm that the switch port is configured for PoE and is supplying power. Try a different PoE port or switch.
7.2. Ora Ana Konektivitas Nirkabel
- Priksa Lampu Indikator: Ensure the "11 BGN" and "11 AN" lights are solid green, indicating the radios are operational. If not, check network connectivity.
- Kabel Jaringan: Verify the Ethernet cable connecting the access point to your network is securely plugged in and functional.
- Status Router/Switch: Ensure your upstream router or switch is working correctly and providing internet access.
- Siaran SSID: Confirm that the SSID (Wi-Fi network name) is being broadcast and is visible to client devices. Check your access point's configuration.
- Setelan Keamanan: Double-check the Wi-Fi password and security settings (e.g., WPA2-PSK).
- Urip maneh: Power cycle the access point by disconnecting and reconnecting its power source.
7.3. Slow Wireless Speed
- gangguan: Wireless performance can be affected by interference from other Wi-Fi networks, cordless phones, microwaves, or other electronic devices. Consider changing the Wi-Fi channel in the access point's settings.
- Kekuwatan sinyal: Ensure client devices are within optimal range of the access point. Obstacles like thick walls can degrade signal.
- Client Device Capability: Ensure your client devices support 802.11n and are using the appropriate wireless adapter drivers.
- Kemacetan jaringan: Too many devices on the network or high bandwidth usage can slow down speeds.
7.4. Cannot Access Management Interface
- Alamat IP: Ensure your computer is on the same network segment as the access point and you are using the correct IP address for the management interface.
- Firewall: Temporarily disable any firewalls on your computer to rule out blocking issues.
- Reset menyang Default Pabrik: As a last resort, if you cannot access the device, you may need to perform a factory reset. Refer to the Juniper Networks WLA532 Software Configuration Guide for instructions on how to perform a factory reset. Pènget: Iki bakal mbusak kabeh konfigurasi khusus.
8. Spesifikasi Teknis
| Fitur | Rincian |
|---|---|
| Nomer Model | WLA532-WW |
| Tipe Wireless | 802.11n |
| Kelas Pita Frekuensi | Dual-Band (2.4 GHz lan 5 GHz) |
| Standar Komunikasi Nirkabel | 802.11n |
| Teknologi Konektivitas | Ethernet, Wi-Fi |
| Protokol Keamanan | WPS (Persiyapan Dilindhungi Wi-Fi) |
| Sistem Operasi | Junos OS |
| Bobot Barang | 13.9 ons (393 gram) |
| Ukuran produk (L * W * H) | 5.71 x 5.37 x 1.77 inci |
| Voltage | 48 Volt (DC) |
| Jumlah Prosesor | 1 |
| Dianjurake Efesus | bisnis |
| Produsen | Juniper Networks, Inc |
| Tanggal kasedhiya pisanan | 6 September 2012 |
9. Warranty lan Dhukungan
For detailed warranty information, please refer to the warranty card included with your product or visit the official Juniper Networks website. Warranty terms may vary by region and purchase agreement.
For technical support, product documentation, software downloads, and additional resources, please visit the Juniper Networks support portal:
When contacting support, please have your product model number (WLA532-WW) and serial number ready.
Ask a question about this manual
Ask about setup, troubleshooting, compatibility, parts, safety, or missing instructions. Manuals+ will review the question and use this page’s manual context to help answer it.